RabbitMQ Quick Start
This tutorial will get you from zero to up and running with RabbitMQ and MassTransit.
Getting started with MassTransit is fast and easy. This sample, which is part of the quick start guide, uses RabbitMQ with .NET 6. RabbitMQ must be installed, instructions for installing RabbitMQ are included in the Quick Starts section.
Prerequisites
This example requires a functioning installation of the .NET Runtime and SDK (at least 6.0) and a functioning installation of Docker with Docker Compose support enabled.
Run RabbitMQ
For this quick start, we recommend running the preconfigured Docker image maintained by the MassTransit team. The container image includes the delayed exchange plug-in and the management interface is enabled.
$ docker run -p 15672:15672 -p 5672:5672 masstransit/rabbitmq
If you are running on an ARM platform
$ docker run --platform linux/arm64 -p 15672:15672 -p 5672:5672 masstransit/rabbitmq
Once its up and running you can sign in to the management UI with the username guest and password guest. You can see message rates, exchange bindings, and active consumers using the management interface.
Configure RabbitMQ
Add the MassTransit.RabbitMQ package to the project.
$ dotnet add package MassTransit.RabbitMQ
Edit Program.cs
Change UsingInMemory to UsingRabbitMq as shown below.
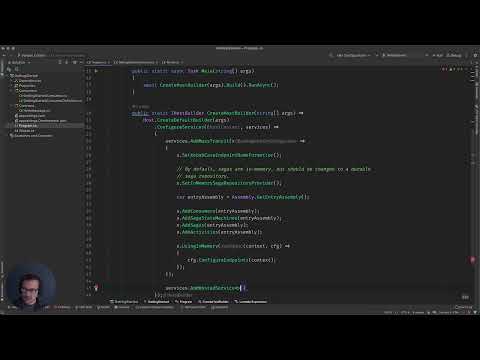
public static IHostBuilder CreateHostBuilder(string[] args) =>
    Host.CreateDefaultBuilder(args)
        .ConfigureServices((hostContext, services) =>
        {
            services.AddMassTransit(x =>
            {
                // elided...

                x.UsingRabbitMq((context,cfg) =>
                {
                    cfg.Host("localhost", "/", h => {
                        h.Username("guest");
                        h.Password("guest");
                    });

                    cfg.ConfigureEndpoints(context);
                });
            });

            services.AddHostedService<Worker>();
        });
The host name, localhost, is where the docker image is running. We are inferring the default port of 5672 and are using '/' as the virtual host. The default username guest and default password guest can be used to connect to the broker and sign in to the management interface.
Run the Project
$ dotnet run
The output should have changed to show the message consumer generating the output (again, press Control+C to exit). Notice that the bus address now starts with rabbitmq.
Building...
info: MassTransit[0]
      Configured endpoint Message, Consumer: GettingStarted.MessageConsumer
info: Microsoft.Hosting.Lifetime[0]
      Application started. Press Ctrl+C to shut down.
info: Microsoft.Hosting.Lifetime[0]
      Hosting environment: Development
info: Microsoft.Hosting.Lifetime[0]
      Content root path: /Users/chris/Garbage/start/GettingStarted
info: MassTransit[0]
      Bus started: rabbitmq://localhost/
info: GettingStarted.MessageConsumer[0]
      Received Text: The time is 3/24/2021 12:11:10 PM -05:00
At this point the service is connecting to RabbitMQ on localhost and publishing messages which are received by the consumer.
🎉